This page is perpetually under construction as customer questions come up…
All tent floors pick up little pin-pricks, punctures and abrasions. Really lightweight tents with 20D, 15D and even 10D floors are quite prone to them. More value oriented tents commonly use 75D floors, so they're less prone to damage. Our tents use 40D floors which puts us in the middle. Luckily it's really easy to fix them with modern repair tapes — in fact it's so easy (and so waterproof) that I recommend carrying an ounce or two of tape rather than a half pound or more of footprint.
Here’s a link to McNett’s “Tenacious Tape” under their Gear Aid brand
Here’s a link to Kenyon’s “K-Tape”
But some swear that this is the best one of all: “Tear-Aid Type A”
I was even told by one MCSer that they did well with it.
Hot tip: buy clear so the color matches automatically.
Modern Tapes Are Also Great for Bigger Repairs! Do this…
These tapes are crazy-sticky so take time to flatten the fabric (iron it with a warm - not hot - iron) and arrange the tear edges so they meet. For tears in netting or really big or L-shaped tears, it's a good idea to use a low-stick tape, like regular Scotch tape, to get everything lined up on one side. Then flip it over to put repair tape on the other side. Then flip it back, remove the Scotch Tape and replace it with repair tape. I highly recommend it be a two-person job: one to smooth and hold the fabric and one to lay down the tapes.
Green Pole End Section and Shockcord replacement
Here's a quick video showing how to replace the green pole end sections. It also shows the (possibly) trickiest part of replacing the shockcord in a tent pole: getting the shockcord end out of the open end of the pole.Here are some shockcord tips:
• you can get to the shockcord by unscrewing the ballends.
• as shown in the above video, you may need a push-rod to push the washer-stopper out of the open end of the green poles (but often not - sometimes it comes out very easily)
• use the old cord to pull the new cord through - a knot should just make it through the tight spots but you can also tape the ends together for a slimmer connection (especially for our smallest diameter pole like on the ML2 and UL2)
• don’t pre-cut the cord. Cut each as you get to pulling the new cord tight in the pole. That will give you the most cord to work with for the last pole.
• on the green poles you want to pull the cord tight from the ballend side
Fabric Maintenance
Here's a video of an epic rainfly repair I did with tape. For coated fabrics, tape is WAY beyond a sewn repair for ease and effectiveness.The video is a little long because you must be slow and careful to pull this off.
There are basically two ways to mend rips in uncoated fabrics like netting or ripstop:
1) Use repair tape on small rips and holes. Even though the tape does not hold as well on uncoated fabrics, it should be good enough.
2) In high stress areas, make a sewn repair using a zig-zag stitch on a light duty home sewing machine. Many outdoor products require specialized sewing machines so finding something that an inexpensive home machine can do well is kind of delightful.
• The technique is straightforward: match the edges of the tear together and use Scotch tape (or any home tape that can easily be pulled off) to hold the sides in place while handling it. I'm a klutz so I space my tape about every three inches.
• The repair is made by using a zig-zag stitch right down the tear line that straddles the two edges so it pulls them together. Use a medium-wide stitch (about 1/4" or 6mm) and the 2-stitches per zig setting. Start before the tear (3/8" to 1/2") and HOLD the thread ends as you start to keep them from being pulled into the stitch. Do not use reverse to lock the first stitches.
• Holding the seam together in front (on the tape is good) and behind (where it's already sewn) and feed or pull to keep the edges aligned so the sides are even when you come to each piece of tape. Just before reaching a tape, remove it. Go past the end of the tear (3/8" to 1/2"). Again, do not reverse sew to lock the stitching. Instead, at the end of your seam, keep the needle down to hold it as you rotate the entire piece 180 degrees so you can forward-sew over the seam you just made WITH A DIFFERENT STITCH.
• With the fabric still being held by the needle and foot, Gently check your repair by tugging on the seam. If there are spots that come apart, where the stitch didn't grab enough material, those will be fixed by the seam you make going back over it. For the areas where the seam was fine, set your machine for a single straight stitch or a small single zig-zag (1/16th inch or 1mm) and sew right down the middle of the seam. If there are spots to fix, just before coming to them set the stitch back to the wider 2-stitch zig-zag and have it gather the hole together as you sew over it. Shortly after, go back to the narrow stitch. At the end, you can do a short reverse stitch to lock it off or you can just clip the threads and call it good.
Pole Maintenance
Soaking your poles in water to release dust and sand isn't a bad idea now and then. Make water flow through the tubes to flush them out. Wipe the outside dry with a rag, paying extra attention to the silver insert tubes. Dry in the sun, folded so the shockcord inside drys out.
If you camp in a salt-air environment YOU SHOULD DO THIS AFTER EVERY TRIP. Salt air causes something called Stress Corrosion Cracking (SCC) in strong aluminum alloys. The good news is that the alloy used in our tents was developed by our pole supplier, DAC in Korea, to be exceptionally resistant to SCC. DAC is the ONLY manufacturer of tent poles to have taken action on SCC– it's yet another reason why we like them so much.
Zipper Maintenance
If your zipper sliders starts to feel rough-sliding and sticky, there's probably grit in the teeth. A soaking in water is usually all it takes to release the grit. Do it with the zipper open so the grit has the most room to come out. Once dry, if you still have friction, the next level up in treatment is to actually wash the tent, probably even with a little soap (see directions here).
Zipper Slider Replacement
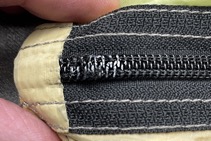
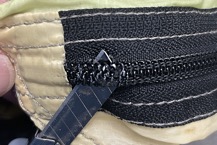
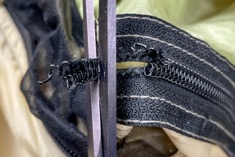
Our tents can last a really long time, so even though we have extra sets of zipper sliders built-in to every tent, if you've worn out both sets of sliders (on both doors) you will need to replace the sliders. Replacing the whole zipper is another solution but it's difficult, expensive and almost never necessary because the teeth are usually fine – it's the sliders that wear out of tolerance so they can't mesh the teeth together. The easiest way to replace the sliders is by cutting about 3/4" of zipper teeth off the tape at the end of the zipper down near the floor (where it's most out of the way). Then zipping the old sliders off and putting the new ones back on (which is the hardest part if you've never done it before). You do not need to cut any fabric or tape for this repair.
First, you have to know a little about the zippers: they're coils zippers which means that the teeth are literally a wire-like coil of plastic that has been STITCHED onto the fabric tape. The coils are only on one side; the other side is flat. On MoonLight tents we put the coils facing into the tent so they stay clean. Also notice that the slot the zipper tape runs through in the slider is offset from center to match the flat and coil sides of the zipper. You will want to remember that when you put the new sliders on.
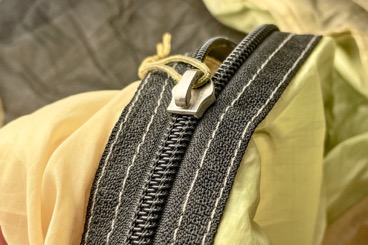
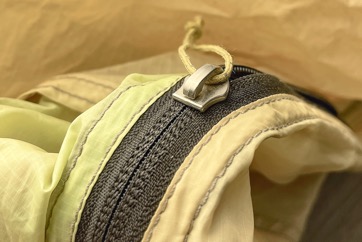
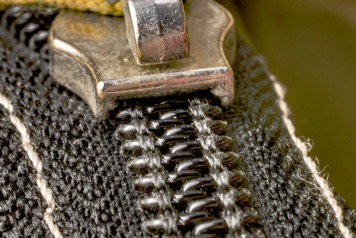
We need to remove some coils to get to the sliders. That's really easy to do: just shave the stitching off the top of the coils. Then pull up the coils enough to cut them with scissors. The tread that held the coils on tends to make things look a little messy but they don't get in the way of the repair. You can pick them out or not. Once cut, the sliders can be zipped right off.
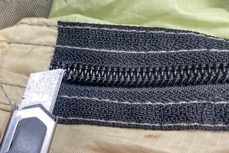
More coming…
Tent pole Repairs
• All moonLight tents come with a pole repair tube – it's the 5-6" long green tube that was on a pole when you first took the poles out. It's a pretty handy little repair item because it's slightly oversized to allow it to slide over a broken area even if that area is deformed.
• The end tips of all our poles UNSCREW to give you fast and easy access to the shockcord ends.
Cleaning Mold
• Despite best efforts to NEVER leave your tent packed wet, even the best of us sometimes mess up. If that happens you will likely be wanting to clean mold off your tent, even if it's only a little here and there.
• A regular wash is always a good start.
• Scrub it down: searching the intertubes for mold cleaning specifically, the list of cleaning products looks like this: vinegar, baking soda, hydrogen peroxide, and alcohol (rubbing) are all said to work to some degree. None of those should be bad for our tents. Maybe keep the peroxide contact time down. Some lists also claim bleach is good - BUT NO. Google "never use bleach on mold" and you'll see a convincingly long list of advice to not use bleach. They say it doesn't kill mold, it bleaches it so you can't see it, and that it could even make the mold spread.
